Friday, August 28, 2009

On the Road -- Salt Lake City UT

WOW -- as they say, "What a difference a day makes!" I've been playing with the Bernina 830 for a few months, but have not had an in depth training on it. I did go to Chicago in February to attend a Bernina national teachers reunion, but that just scraped the surface and left me wanting more. So today was a big eye opener for me.


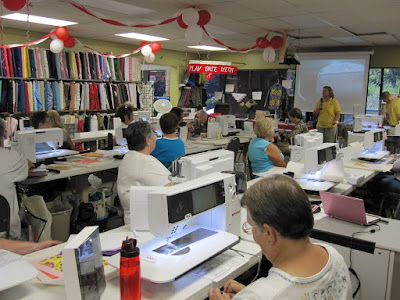
Today we addressed sewing operations on the machine and tomorrow we will be exploring machine embroidery. We all piled in this morning and set up machines. There were about 25 of us taking this class, so definitely a full room. It's a really good thing that Nuttall's has a really big classroom and can accommodate us all comfortably.


We started the day with a lecture by Eric Lopez about basic maintenance of the machine and troubleshooting when things go wrong. This session alone was worth flying here from California! Eric had so much detailed information and as he was talking to us, there were also illustrations of the machine parts projected onto a big screen, so we could all follow along easily. We learned the usage of the multi-function tool, which basically allows you to get into areas of the machine and correct any problems that are happening. The beauty of this is that you can fix simple problems on your own instead of taking your machine into the shop. As Eric pointed out, when a machine weighs 38 pounds, it's nice not to have to haul it in to have someone look at it!


When we got to break time (I was SO ready -- my brain was full!), I toured the table where all of the class project samples were displayed. There were home dec items, such as pillows, bolsters, and the like as well as wearables.


Two of the projects in the "Date with 8" series of technique classes.


We played with the BSR foot and a daffodil cut from printed fabric, free motion stitching the flower to a piece of muslin with batting underneath. I had only brought neutral colored thread and thought that I couldn’t do anything much in the way of decorative “stuff” with it, but Karol Hogan totally proved me wrong.


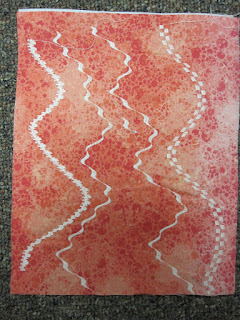
Balance: The balance icon on the machine looks like a pair of scales. When you touch this icon, it takes you into a screen that changes the balance of a stitch to create an undulating effect. Since this is directional sewing, we used a 40C foot. In the middle of my fabric, I used Stitch #414, selected Balance, and then moved the stitch width knob slowly back and forth within a range of -14 to +14 while sewing. Joni was the instructor for this class and she said that this a pretty normal range to get this kind of look. The use of this technique created a ribbony effect on the fabric. The pattern stitched out on the right was stitch #405 which makes rows of little boxes; On the left is stitch #418. It would be fun to work with some of the other decorative stitches to see what sort of embellishment effects one could come up with.


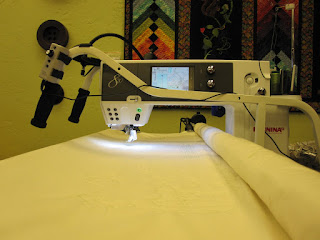
In this section of the class, we were doing tapering stitches. We were taught how to use both manual (for shapes without equal length sides) and recording (for shapes with equal sides, such as squares and equilateral triangles). Joan Perry is working on hers here.


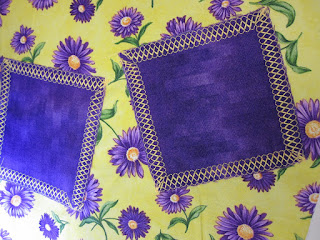
This is Joan's sample up close; see how nicely her corners have tapered using this feature? She used what I thought was a bright yellow thread that went with pretty much every project we did today. When she showed me the thread, it turned out to be an almost day-glo orange Isacord polyester embroidery thread -- what a surprise!

Tune in tomorrow for the embroidery class!

Thursday, August 27, 2009

On the Road -- Salt Lake City UT

Today I'm in the air -- Southwest Airlines, to be precise -- on my way to Nuttall's Sewing Centers in Salt Lake City, Utah. This isn't a teaching trip; it's a learning trip! Since I rarely get to take classes, I am very excited to be doing this.


I actually get to spend two whole days learning all about the new Bernina 830 -- doesn't she look beautiful in my sewing room? I've been doing demonstrations on the Bernina for a few months, but have barely scratched the surface of her capabilities, so I am so looking forward to doing the "deep dive" and strengthening my skills.

My biggest knowledge gap is in what I call "embroidery world". The hooping was such a pain in the butt and I just knew I couldn't spend the time learning this while I was getting so frustrated with the whole hooping and re-hooping thing. However, there is a new hoop to go with this machine, the Jumbo Hoop; it's so big that it eliminates a lot of re-hooping on projects. So I will definitely take another look at that.

The paramount reason to learn this? Sometimes, when I am teaching free motion quilting or another quilting technique, such as trapunto, students feel that their skills aren't up to the task. They may have a physical disability that makes control difficult or they may not have the time to put in the practice hours or may not want to. For those students, I would like to be able to demonstrate another way to accomplish the technique -- namely, using the embroidery features of the sewing machine. I was talking this over with Rhonda Lopez, owner of Nuttall's, and she invited me to take this class.

With that in mind, I'm planning to spend Friday and Saturday exploring the machine in class and Sunday working with Eric and Chad, two of Rhonda's sons, on the embroidery aspect of my quest. I'll post from Salt Lake City and keep you up to date on what I learn!

Wednesday, August 26, 2009

How much fabric "should" you buy?

A few years ago, I took a reverse applique class from David Walker, who makes remarkable appliqued and embellished quilts. David stated that his personal philosophy of embellishment was "Excess is never enough!". I have to admit that sometimes that sentiment creeps into my fabric buying.


Within a year or two of making my first quilt, I was fabric shopping with my Aunt Barbie (Barbara Walsh of Spanish Fork UT, a powerhouse in the Utah guilds) and noticed that she was buying fat quarters of everything she liked and that shop owners were quite nice about cutting one for her from the bolt if there wasn't one already available. It really didn't seem to me that there was enough fabric in a fat quarter to do anything with, but I started collecting them anyway and a few years later made a quilt entirely out of that FQ collection that became one of my favorites (the one that Aunt Barbie tries to steal from me every time she's near it). I found that I could make two leaf blocks from a fat quarter and, even though I wasn't converted to scrappy quilts at that time, I did start buying smaller cuts -- to me, that's a half yard.


Basically, the way I buy fabric is dependent on how I think I might use it -- duh, you might say! But now that I am making scrappier quilts, I am buying half yards and adding them to my stash, loosely sorted by the other fabrics that I might use with them. Because I like to cut border fabrics on the lengthwise grain, if I think I might use a fabric as a border, I always buy 3 yards; that gives me enough fabric even if the quilt winds up queen size. I seem to mostly make twin size or large lap quilts in the 60"-65" wide by 80" or so long range, so 3 yards gives me my border length plus extra to use in the piecing or setting/corner triangles if I put the blocks on point.

All bets are off, however, if the fabric is PINK! Pink is inarguably my favorite color and I use it a lot in my quilts. I always buy at least a yard if I spot a pink I don't have, particularly if it involves another love of mine, POLKA DOTS! What can I say -- we all have our weaknesses!


I was leafing through one of my favorite books this morning, "Fabric Shopping with Alex Anderson". This was published by C&T in 2000 and now, unfortunately, is out of print. However, all is not lost -- I called Alex this morning and she does have copies of this book available. You can reach her through her website, www.alexandersonquilts.com, for information on purchasing the book.


Before you get to the 7 quilt patterns in the book, which are all really pretty and easily achievable, Alex has a quite involved section on what fabrics to buy, how much to buy, how to store them once you get them home and how to combine fabric colors and textures for the most impact. Since the book also contains good general instructions for quiltmaking, it would make an excellent resource for someone beginning on their journey to addiction!

Because Alex's quilts tend to be scrappy, she buys smaller quantities of fabric than I do. For instance, she often buys 1/3 yard of tone-on-tones and other fabrics that are readily available. She buys 1/2 yard of a polka dot and 3/4 yard of a stripe, which tends to be a little harder to find. I would probably buy a yard of each of those. However, we do agree on large scale prints that might be used as borders; she feels that 2-3 yards are safe, probably because she tends to make smaller quilts than I do. Most of Alex's quilts are no more than 55" in their longest dimension --- I know this because I have quilted a LOT of them, including the 7 in this book.

Looking at the state of the fabric contained in my bookshelves and Tinkerbell chests, I should probably curl up with a glass of wine (oops - its 9:45 am; maybe not!) and re-read Alex's section on fabric storage....


Tuesday, August 25, 2009

And what about fabric shopping?

This could actually be subtitled "Fabric! Fabric Everywhere!" I'll scatter a few random shots of my sewing room here and there so you can see the good, the bad and the ugly -- just to establish that I am obviously not a fabric shopping pro. Well, not if "pro" means that the fabric purchased is actually going to be used imminently in a project. If "pro" means "winner in $ spent on a particular day", I may have to reconsider.


This particular bookcase (not that a book has ever laid its cover on it, mind you) has six shelves, of which these are the top four. The top two are, more or less, fabrics sorted into color groupings, while the other two that you can see are filled with quilts-in-the-making; in other words, all of the fabric that I would need to make the quilt top. Sometimes I am even foresighted enough to stick the book or pattern right in with the fabric so that when I'm ready to cut, everything is in one place. Sometimes not!


This earns the title of My Favorite Bookcase because it holds all of my hand-dyed fabrics. Some of them have been dyed by me, some by my friend Saundra Seth of Pieces of Dreams and still others were purchased in stores, at quilt shows and from teachers when taking guild classes.


This shot is the bottom two shelves of those bookcases. Again, the fabrics are loosely color-themed, but more holiday -- Halloween, Christmas, fall, etc. -- on the left, wild colored prints as well as some ethnics on the right.


These two Tinkerbell toy chests are full of fabrics that are mostly sorted into multi-color groupings that I am collecting for a future project. For instance, I have a very large stack of fuschia and orange prints because I am convinced that there is a quilt combining those colors in my future. When I was at Pass Patchers guild the other day, one of the members showed a beautiful pink and orange quilt during Show & Share. I loved it!


I also have pink/brown prints (complete with a few polka dots of varying sizes), a lot of large scale florals because visions of these made into quilts and embellished with lots of beads dance before my eyes on a fairly regular basis, fabrics with shoes on them, fabrics with candy and other goodies, and lots and lots and lots of pink fabrics -- definitely my Go To color!


So how do I decide how much to buy of a fabric that I just can't live without? Hmmmmm.....I'll have to take some time to think about that!


Sunday, August 23, 2009

Shopping for Quilt Supplies -- How Much Thread?

Like most people, I never knew how much thread to buy for any given quilt project. Because I do more quilting than I do piecing, and a good deal of that is done on other people's quilts, I always had to have a pretty good supply on hand. Either that, or be willing to drive to the quilt store (which, when I first started my machine quilting business, was an hour round trip IF I didn't talk to anybody!). Even after quilting quite a few quilts, though, I still didn't really have an accurate idea about how much thread I needed to buy. I always had a couple of spools left over -- usually in a color I wouldn't ever buy for myself -- or I ran out on Saturday night and the quilt shop was closed until Tuesday!

I finally solved the problem by talking to a couple of the wholesale companies that I normally bought quilting supplies from, such as markers and needles, to see what I could find out about buying thread in quantity. My solution was to buy the thread fixtures at right, which are on one wall of my sewing room. The fixture on the left is Sulky 40 wt. rayon, 850 yard spools, in 231 colors. The one on the left is filled with Mettler Silk Finish, 100% cotton, which is a 50 wt. thread.

That solved the supply side of the equation, but I still had to do something about the demand side -- in other words, how much did I actually need for each project.

I am a big fan of Bob and Heather Purcell, the owners of Superior Threads, located in St. George, UT. I'm using their threads more and more in my quilting and LOVE their Vanish Extra water soluble thread for trapunto work. You'll see Bob and Heather travelling around the country, selling their threads at various quilt shows. Bob also teaches classes about threads and, if you see that he will be in your area with one of his lectures or with Alex Anderson, Ricky Timms and Libby Lehman at a SuperSeminar, by all means make sure not to miss Bob's presentation. I think that I am fairly knowledgeable about threads, needles, tensions, etc., but it's my humble opinion that Bob has forgotten more than I'll ever know.

A few years ago, Bob started an on-line newsletter that you can subscribe to by going to www.superiorthreads.com. Click on "Newsletter" and enter your e-mail address; the newsletter arrives in your in box approximately every other month. It starts out with a "Wise Word from Mother Superior", which is some sort of sewing tip or trick, then goes into the education section, then into new things about their threads (one thing I do have to say here is that I use their threads a lot and none of my machines have problems with them). At the end of the newsletter is one of Bob's Superior Jokes, which are actually archived under "Other" on the website in case you feel that you must have more of them!

One of these newsletters contained the solution to my thread quantity problem. I was so impressed with it that I called Bob and asked if I could copy and distribute this to all of my machine quilting students; he said yes and I have been using it as a handout to my Intro to Machine Quilting classes as well as my Free Motion and Trapunto workshop attendees. And here it is for you, too:

Education: How Much Thread do I Need for This Project

We often are asked how much thread it takes to quilt a quilt. It depends on the size of the quilt and the type of quilting to be done. The most thread I’ve seen used in a quilt is 20,000 yds. (10,000 yds. of MonoPoly invisible thread in the bobbin and 10,000 yds. of Nature Colors and Living Colors on top). This quilt is a beautiful thread painting entitled Precious Water by Hollis Chatelain and won Best of Show in Houston in 2004. Everyone’s technique is different so the following yardage numbers are only averages. Of course it is possible to use much more or much less thread. These numbers are for the top thread only. Double them if you use the same thread for the bobbin. The three sets of numbers following the quilt size represent Light Quilting/Medium Quilting/Heavy Quilting.

Crib size: 200 yds./400 yds./600 yds.

Twin size: 400 yds./800 yds./1,200 yds.

Queen size: 600 yds./1,100 yds./1,600 yds.

King size: 700 yds./1,300 yds./2,000 yds.


Reprinted with permission from
Bob Purcell, Superior Threads
www.superiorthreads.com


Also, while you are on the website, you can sign up for Mother Superior's blog; it's fun and educational, too!


Friday, August 21, 2009

Home Again -- For a Few Days, Anyway!


The trip to Yucaipa was a lot of fun! I stayed with Susan Wamsley, the Program V.P. of the Pass Patchers Quilt Guild. Susan is also President of another guild in the area, Citrus Belt, and knows all the ins and outs of hosting a teacher.


I was hoping that the guild's opportunity quilt would be at the Wednesday morning guild meeting so that I could get a picture, but it wasn't. Susan was kind enough to e-mail a picture so that I could share this quilt with you. It's amazing! The quilt layout was designed by Francine Landau of the guild and the patchwork blocks (designed by Ellen Hopkins) were made by about 30 guild members. The applique borders and medallion (designed by Sharon Schamber) were done by nine members of the guild. Lynette Harlan of Bluewavequilts.com did the machine quilting.


If you would like to own this quilt, you can buy tickets from Pass Patcher guild members at Road to California 2010 (for more info on Road, you can go to http://www.road2ca.com/) on Saturday, January 16, at the Ontario Convention Center in Ontario CA. Road to CA does the guilds a great service by providing them space to display their opportunity quilts and sell tickets at a venue that attracts a lot of people. It's always an excellent quilt show -- I have had the opportunity to teach there, in the Bernina classroom, several times in the past and I'll be there again for three days in 2010. I'm definitely looking forward to that!


For more information on Pass Patchers Quilt Guild, as well as other guilds in California, I found a very cool blog. Here is a web address to her page on guilds and what is going on with them: sewcalgal.blogspot.com/2009/08/quilt-guilds-for-opportunities-to-learn.html


Yesterday, I taught Intro to Machine Quilting and these pictures were taken as I was demonstrating my fluff and stuff technique for moving big quilts through the machine. I had brought my Bernina Artista 730 to show the class that -- yes -- you really CAN quilt those "big ones" through a regular home machine! We had a full class yesterday and a lot of fun!

Now I'm home for a week until next Thursday when I fly to Salt Lake City to take a class rather than teach one...more on that to come!


Tuesday, August 18, 2009

On the Road -- Yucaipa CA


Today I am driving to Yucaipa CA, which is only about a 2 hour drive from my home. I'll leave around 4 or so, grab a venti sugar free vanilla iced latte (whole milk - none of that blue stuff for me!) in the Starbucks drive-through and then enjoy the pretty drive through the mountains of Wrightwood on my way to Yucaipa.


Tomorrow morning I'll present a quilt and information filled lecture called "Confessions of an Avid (Some Say Batty) Machine Quilter" to the Pass Patchers Quilt Guild in Beaumont CA, a neighboring community. If you are free at that time and are so inclined, the lecture will be held at the Beaumont Civic Center, located at 550 East 6th Street in Beaumont. The guild meeting will begin at 9:30, with my lecture scheduled from 11 am- 12 noon.


"Confessions" is a fun lecture; I show a lot of quilts, from the very first one to the present, showing my progress as I moved from a hobby quilter to a professional who quilted tops for others on my domestic machines.


On Thursday, I'll be teaching a workshop called "Introduction to Machine Quilting". It's a beginner level course on machine quilting on a domestic machine, covering straight stitching, free motion, and how to get a big quilt through a regular sized machine. If you are interested in the workshop, you can click through to my calendar for the contact information and also to see if I will be visiting a guild or shop in your local (or at least driveable) area. The website calendar link is http://www.battsintheattic.com/PrimaryPages/work_cal.html


Hope to see you on the road!

Monday, August 17, 2009

Free Motion Boot Camp at Quiltique

Today's post will be a bit long, because before we got busy with class I did a slow walk around of the shop. One of the reasons was the number of machine embroidered quilts on display. My first exposure to machine embroidery in quiltmaking was the Latte Quilt that was done by Bernina of Australia with Kerrie Hay and resulted in a book/CD combo that was published in 2001 by Quilters' Resource publications. Several of my friends have either made this quilt or some of the blocks and it looked like a lot of fun and the quilts were gorgeous.

I've decided to at least learn the basics of machine embroidery, so looking at all these beautiful quilts was certainly inspiring!


Loved the colors in this quilt and you can really see the quilting in the closeup shot of one of the beautiful flowers.


This quilt was displayed in the front of the store, prettily draped to show off all that embroidery.


The closeup is one of several repeated blocks and really shows off the beautiful background fabric as well as the heavily embroidered design.


An interesting way to combine pieced blocks with machine embroidery.


A beautiful black and brights quilt by Kay McCain. An abundance of leaves, flowers and animals are embroidered in the vertical columns. As with almost all the quilts in the shop, there are classes available; kits are ready to go home with you for a lot of them as well.


Another embroidered floral quilt; this time combined with a lot of half-square triangle piecing. The embroidery in the border is just as spectacular and well executed as it is in the individual blocks, but I just had to lean in and get that block shot to show the colors and intricacy of the embroidery.


I've seen quite a few redwork embroidery quilts done by hand; this one, which was hanging in the classroom, was done by machine. The closeup is of one of the embroidered blocks. There were several different flower embroideries repeated in the blocks.

* * * * * * *

When I finally wandered into class, almost everybody was there setting up their machines. There were 22 people in this workshop, so it's a good thing that Quiltique has a BIG classroom.


I lectured about needles and threads and then gave a demonstration of free motion quilting. Pretty soon everybody got down to work.


Sherlene takes a minute to look up and smile, but Connie keeps her nose to the grindstone. I took the pictures of the workshop participants from a little bit of a distance so that you could see all of the beautiful quilts on the classroom walls.


Bobbie is the lady on the left who looks like she is really concentrating on her free motion project! She had heard about the BSR (the Bernina Stitch Regulator feature that produces even stitching based on the movement of the fabric under the special presser foot) so toward the middle of the day, she tried free motion quilting on the Bernina 830 machine that I had been doing the class demonstrations on. It was all threaded up and ready to go -- she liked the BSR so much that she bought a BSR-equipped 630 immediately after class!


Patti also recently bought a 630 and was taking the class to get some good "seat time" with her new machine. She took both days of classes and just really buckled down and spent as much time sewing as possible. Not much chatting for her!


I think maybe there was a conference going on in this corner....


Work a little, chat a little -- isn't that what taking a class is all about?


Jan and Bob Tibesar are the owners of Quiltique; their two daughters are also a big part of this family owned shop, although I didn't get to meet them as they were both still on maternity leave after presenting their parents with brand new granddaughters! Here are the three of us standing in the very empty, very quiet classroom after a fun-filled day.....

Friday, August 14, 2009

Borders & Bindings workshop at Quiltique

Today I taught Borders & Bindings at Quiltique. B&B was designed for quilters who wanted to learn more about different types of borders and how to apply them as well as some of the "oddball" binding techniques, such as prairie points and scallops. This has proved to be a pretty popular class, so I filmed a DVD that pretty much follows the class outline. To read more about the DVD, you can go to www.battsintheattic.com.


The supply list for this class calls for a fat quarter (18"x22") of a focal fabric plus four long quarters (9"x44") of coordinating fabrics. We start out by arranging the fabrics in order: focus fabric, first border (just a plain old straight border using first coordinating fabric), second border ("crumb catcher" -- a folded strip placed between two borders -- using second fabric) and final border (third fabric) with cornerstones (fourth fabric). Once the fabrics were laid out and the order decided upon, then we were ready to start cutting and sewing.


Sherlene started with a focus fabric that combined turquoise, orange and green in an abstract print. Her coordinating fabrics were turquoises; she told me that these really weren't her colors, but that she needed something in those colors. And now I'm thinking -- why? For a gift? For a room? For a ? I'm sure she told me and one of those random senior moments has occurred.


She raced through the piecing and was the first one finished, then patiently waited as everyone else caught up and I did my "end of day" lecture. End of day consists of an explanation on how to do multiple borders and miter them, how to do a prairie point finish and a demonstration (meaning that I actually SEW instead of just talk) of double fold bias binding and scalloped bias binding.


When I first saw Sharon's fabrics, I went "Holey moley, that's a whole lot of orange!" Orange seems to be a color that a lot of quilters don't even want to approach, but Sharon combined it with purples, did it all in batiks, and came up with a winner.


If you look WAY down in the lower right hand corner, you can see the project that Bette is working on. She started with a bird panel print and had chosen some browns and a bright apple green to go with it, but wasn't sure she liked what she had. Bette wandered out into the shop and chose a very cool harlequin print that picked up all of the panel colors and, by using that fabric as her final border, made the piece work for her. Since there are 1000's of bolts of fabrics at Quiltique, we weren't at all surprised that she found one that was perfect.


I got so excited about this variegated fabric that shaded from very pale purple at one selvage edge to very dark purple at the other that I didn't even get a picture of Patti with her class project. Just stopped by her work space and shot a pic of the fabric.....oops!


Anita's focus fabric was spools of thread in bright colors on a black background. She chose some solids to do her borders and they really worked well to "cool down" the action of what some might consider a busy print.


Bobbie brought the cutest comic-book-style Halloween panel describing all kinds of funny sayings about cats. (Halloween bonus points alert -- teacher's quilting and pattern business is called Batts in the Attic!) Bobbie had already put on the first small white border at home and then continued with her seasonal colors once she got to class. Another picture of the project without the person who brought it -- double oops!


Renie also got bonus points for choosing Halloween fabric; to coordinate with her focus fabric, she chose an orange print, a solid black "crumb catcher" and you can barely see the very cool green/orange/black check at the left of the photo that she used for her outer border.


Renie's good friend Linda chose pastels in shades of purple, green and blue on a cream background -- had that beautiful, soft watercolor look. I could tell they were good friends because they bickered just like me and my best friends do -- all in a loving way, of course!
Tomorrow is a technique class rather than a project class. It's called "Free Motion Boot Camp with Trapunto Training". It was named by Robin, the Bernina dealer in Asheville NC. Robin and her husband Chip own the Asheville Cotton Company, a very cool shop to visit if you get to North Carolina. The name is so fun that I think I'll use it forever!


Thursday, August 13, 2009

On the Road -- Henderson, Nevada


Today was a driving day! I'm always happy to drive because I can not only pack as many suitcases as I want, but I can throw anything I may not be able to live without (like six pairs of shoes!) regardless of how much it weighs. I remember almost mugging Bethany Reynolds in Nashville a couple of years ago because she had a full size tube of toothpaste and I only had enough room for the travel size! I also like driving because then I can even take my bigger, heavier quilts that nobody gets to see unless they happen to catch me at a guild or shop within driving distance, which is pretty much California from about Sacramento or San Francisco on down and parts of Nevada and Arizona.


I draw the limit at about a 6 or 7 hour drive and Quiltique is around 4 hours if I'm kind of lazy about it -- making a Starbucks stop, maybe a stop for lunch, or just to look around if the weather's agreeable. Today topped out at about 105 degrees, so no getting out of the car unless absolutely necessary.

If you haven't heard of Quiltique, you most likely will soon. They are one of the featured shops in the upcoming issue of "Quilt Sampler" magazine which will hit newsstands next month.


As soon as I walked in the door, I could see why -- thousands of bolts of fabric and quilts hanging everywhere! I took pictures of some of the quilts and I'll share those with you next post.


When I got here this afternoon, there were six or seven staff members here, which I thought was pretty impressive for a hot summer Friday afternoon. Here are Cynthia and Lynne, who along with Kay McCain, tried to familiarize me with this very large store so that I know where to direct students if they need something (of course if I'm really smart, I'll direct the students to one of the people who already know where everything is!). Take a look at that notions wall behind them -- there's even more that didn't make it into the picture -- one of the most complete displays that I've seen anywhere.


Each fat quarter bundle has a pretty Quiltique ribbon around it as well as one of their brights-on-black cards -- perfect gift for my secret pal......


Animal prints and African fabrics -- two of my way faves -- I am sure that some of those are coming home with me. I've started buying yard cuts of animal prints to use for binding. Even if there isn't any animal print in the rest of the quilt, it's a fun thing to do.


There's the Bernina 820 all set up on the frame, just waiting for someone to come along and play!


The classroom is HUGE -- I know that it's big enough to hold the 22 people I have in Saturday's class! This is only the front part of one side of the room; every wall is covered with quilts -- can't wait until tomorrow morning!
For more information on Quiltique, you can go to www.quiltique.com/home/
Related Posts Plugin for WordPress, Blogger...