
A burst of energy fell on me Sunday afternoon, so I did all of the straight stitching on the Poetic Blossoms panel quilt and decided on the stencil that I was going to use for the blocks. Choosing a design was interesting in that, even though they are the same size, I had decided to quilt the panel blocks in the four corners of the quilt differently than the blocks that were just cut from fabric. Ultimately, that made the design choice pretty easy.
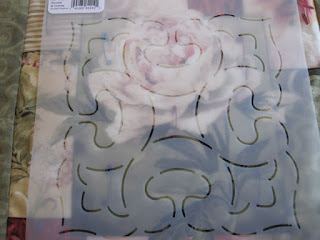 This stencil is #HH2 from QCI, Inc,, who conveniently printed their website URL on the stencil label. It is pretty aggravating when I use a stencil for a project and then can't give people the source if they want to duplicate my results. To go to the QCI website, click here.
I chose this one because it is what I call a "two path" design, meaning that there are two continuous designs that are stitched separately. In this particular stencil, there is an inner path and an outer.
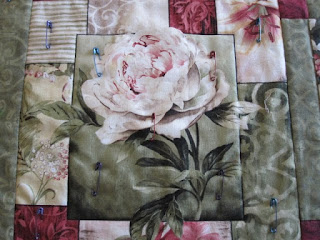
Each of the four blocks cut from the printed panel fabric featured a large flower with a frame around it. Looking at the panel block above, I did straight stitching around that inner flower area, so that I can do my stencil design inside the black line where the flower is and then a separate narrow border design outside that black line.
Here is the panel block with just the inner path of the stencil stitched; after that, I can add a narrow border design in the 2" area around the flower to differentiate the panel blocks from the "plain" blocks that were cut from the coordinated printed fabric.

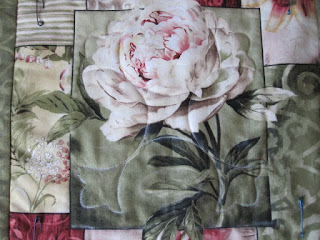
The printed fabric blocks have the whole design quilted into them, both the inner and outer paths. I did a few of the blocks on Monday and then spent Tuesday running errands and doing things around the house. Today I got back to work on quilting the blocks.

Marking was challenging; there are both light and dark areas in each of the printed blocks. Blue water soluble marker is used for almost all of the block at left....
...then the markings were "touched up" with white chalk so that I could see the markings in the dark areas.
For the white chalk, I used the Ultimate Pounce Pad, which is pretty amazing -- you just swipe the applicator over your stencil and it doesn't smear, fade or disappear in any other way until you want it to. Then you have your choice of either washing the quilt to get rid of the chalk or, if you aren't planning to wash it, you can iron it off with a medium hot iron. Pretty spiffy!
Okay, back to work -- my plan is to get all the blocks quilted today so that I can start marking the border...
This stencil is #HH2 from QCI, Inc,, who conveniently printed their website URL on the stencil label. It is pretty aggravating when I use a stencil for a project and then can't give people the source if they want to duplicate my results. To go to the QCI website, click here.I chose this one because it is what I call a "two path" design, meaning that there are two continuous designs that are stitched separately. In this particular stencil, there is an inner path and an outer.
Each of the four blocks cut from the printed panel fabric featured a large flower with a frame around it. Looking at the panel block above, I did straight stitching around that inner flower area, so that I can do my stencil design inside the black line where the flower is and then a separate narrow border design outside that black line.
Here is the panel block with just the inner path of the stencil stitched; after that, I can add a narrow border design in the 2" area around the flower to differentiate the panel blocks from the "plain" blocks that were cut from the coordinated printed fabric.
The printed fabric blocks have the whole design quilted into them, both the inner and outer paths. I did a few of the blocks on Monday and then spent Tuesday running errands and doing things around the house. Today I got back to work on quilting the blocks.

Marking was challenging; there are both light and dark areas in each of the printed blocks. Blue water soluble marker is used for almost all of the block at left....

...then the markings were "touched up" with white chalk so that I could see the markings in the dark areas.
For the white chalk, I used the Ultimate Pounce Pad, which is pretty amazing -- you just swipe the applicator over your stencil and it doesn't smear, fade or disappear in any other way until you want it to. Then you have your choice of either washing the quilt to get rid of the chalk or, if you aren't planning to wash it, you can iron it off with a medium hot iron. Pretty spiffy!
Okay, back to work -- my plan is to get all the blocks quilted today so that I can start marking the border...
No comments:
Post a Comment