Saturday, October 20, 2012

Bernina Sewing & Design -- Las Cruces NM

Today was the most awesome day! I taught Fluff & Stuff here in Las Cruces on Thursday and Friday and today was Free Motion Boot Camp! It was so much fun teaching free motion techniques and watching everybody up their game!


First of all, I got to sew on the new Bernina 780 for the past three days; it has a 10" opening and includes machine embroidery capability. This is a brand new machine that just shipped to stores this month, so this was my first opportunity to sew on one. The screen is different from the Berninas I'm used to, so there was a bit of a learning curve, but it was pretty intuitive and easy to use.


Here are a couple of views of my class working hard and the colorful quilty classroom.


Marsha Cowan owns Bernina Sewing & Design and decided to take some time, sit in on the class and play for a while. She chose this beautiful coral fabric, two shades of Floriani 40 wt. embroidery thread and a spool of YLI silk thread to make the sample above.


A closeup of the detail work in some of Marsha's feathers...interesting how the color took so much lighter in the closer photo. The color is actually more like the first picture.


More curvy loops....later Marsha echo stitched around those and then added more background fill around the stitching to make it really pop out.


This was one of the shop samples -- as a class we discussed various ways to quilt it. Prior to the class, most of the people in class said that they would have assumed that they either would have to stipple or do a diagonal grid in the background; after class, they were coming up with all sorts of neat ideas.

Tomorrow I'm going to do some sightseeing with Marsha and her husband Izzy and then Monday afternoon, I hop a quick flight to Dallas to teach for Ace Sewing in Wichita Falls and Denton Sewing in, well, Denton! Hope to see you in my travels!

- Posted using BlogPress from my iPad

Saturday, September 29, 2012

Thinking About Quilt Market

I'll be going to Houston this year, both Quilt Market and Quilt Festival.  I get to sit and sew, doing demonstrations on new machines -- exactly my idea of a good time!

Thinking about Quilt Market led me to review the pictures I took at Spring Quilt Market in Kansas City this past May.  This picture was in one of the vendor booths:

I REALLY wanted to buy the sign!  But that wasn't the business they were in.....

Dreamweaver's MuVit Foot

Still learning my Dreamweaver machine and needed to do some straight stitching, so got out a foot I hadn't used before.

This feature is actually called MuVit digital dual feed -- it's a honking big foot! 

Here's a picture of my regular "J" foot that I use for piecing next to the MuVit foot. 

I used it to sew the binding on this Radiance piece -- selecting Radiance for the binding was madness, because it's slippery and not the easiest fabric to handle.  Cindy Needham likes to use Bosal woven stabilizer to give Radiance some body when she uses it and I probably should have done that.  I didn't use Bosal for either the binding or the quilted piece.

That said, I expected more difficulty than I got.  The MuVit foot did a good job of getting it sewn down with a minimum of hair pulling.  I just have to steam the piece to flatten the binding a bit.

Next, I decided to do some straight stitching.  I already had a diagonal grid stitched on the olive green Radiance piece that I have almost finished and wanted to add some up and down straight stitching to give it more density.  This was a good opportunity to use the MuVit foot with the laser sew straight guide.

As shown on the screen above, my needle position (lower right hand corner) and laser position (just to the right of the picture of the laser) are both set at 3.5 because I want the needle to sew right down that laser line.

I'll be able to stitch from corner to corner following the laser line.  For illustration, this picture is taken as if I'm sewing from the right side of the fabric; since the Kimono Silk that I'm working with is on a bobbin, I'm going to sew from the back of the work.

And here's how it looks as I stitched it on the back....

And here's the right side -- I think it looks really good and the laser was easy to follow.  I have wool batting in this piece and the MuVit foot did a good job keeping everything flat.

I will definitely use this foot for binding and diagonal grid.  At this point, I won't use it for stitching in the ditch because of the closed sole plate -- I just can't see in there to make sure I'm on the correct (low) side of the ditch.  However, I have asked for an open toe sole plate and Brother has been extremely and quickly responsive to requests in the past, so keeping my fingers crossed as to delivery date.  I hope it's soon!

Tomorrow I fly to Chicago to do some more video work.  It's going to be over 100 degrees here at home all week and in the high 60's/low 70's in Chicago -- hooray!  Boot weather!

Brother has provided me with the DreamWeaverTM XE, but all opinions expressed are entirely my own....

Thursday, September 27, 2012

"My Designs" Workshop with Cindy Needham

Last week, I made a trek up to Northern California to take a five day workshop from Cindy Needham.  Cindy does an entirely different style of quilting than what I do -- I make big soft quilts to wrap oneself in; Cindy makes incredible show quilts.  I had taken two days of her instruction at the High Desert Quilt Guild in Ridgecrest CA last year and was eager to learn more about her style.

I took my Brother DreamWeaver XE and really put her through her paces.  Four and a half solid days of free motion sewing -- I don't take a lot of breaks for shopping and such -- were a pleasure with this machine.  I tried a lot of different threads and got beautiful stitch quality.

Cindy teaches how to combine stencils and freehand work in the same piece.  Sometimes we only traced part of a stencil; for instance, the spine of a feather for guidance and then filled in the rest with freehand quilting.  I also learned a number of interesting backgrounds to show off the primary work.

But that's enough talk -- let me show you what I did!

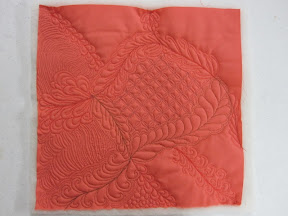
This is the first piece I worked on.  It measures approximately 9" x 12"; I used Radiance fabric, both front and back, and wool batting.  I marked one side of the fabric with the curvy lines that were on one of Cindy's handouts to us and stitched the lines with Glitter in the top of the machine and Bottom Line in the bobbin.  The rest of the work was done freehand with Kimono Silk in the top of the machine and Bottom Line in the bobbin.  Cindy is an educator for Superior Threads and brought her "thread bar" for us to use as well as a good assortment of Superior threads from her personal stash.

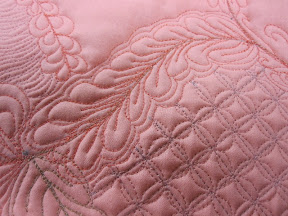
This is the second piece that I worked on; it measures 21" wide by 17-1/2" tall.  I have white Kona cotton on the back and Radiance on the front.  This also has wool batting in it; Cindy's a big fan of wool for its lightness and loft.

I traced guidelines from three different stencils, giving me the "bones" for the spine of the feather, the pinwheel in the lower right and the 8 sided geometric figure at the top right.  The rest was all filled in freehand, including all those feathers!  Didn't think I could do that, but it was what I was hoping to learn....

Since I was working from the back of the piece, I used Bottom Line in the top of the machine and three different threads in the bobbin -- for the "bones", the part I wanted to stand out, I used King Tut.  At Cindy's urging, for all the feather work and other foreground stitching I used a contrasting, light brown, shade of Kimono Silk; all of the background fills are done with a shade of Kimono Silk that more closely matched the fabric.

I still have more work to do on the piece to make the grid in the upper left hand corner more dense, particularly around the feathers.

Here's a closeup of one of the backgrounds based on a 1/2" diagonal grid.

The center of the four sided feather shows another background fill, a bit of echo as well as an S-curve fill.

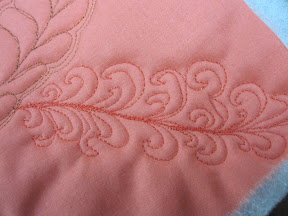
This is the third piece I had brought; it is composed of four orphan blocks from a workshop I took from Miriam Nathan Roberts at Asilomar several years ago.  I whomped the four blocks together and brought it along.  All I got done were the center feathers and a little bit of stitching with gold Glitter thread in the upper left hand block.

To do the feathers, I just hand drew the spine, stitched it, then filled in with the feathers freehand.  I expected this to be difficult as far as spacing and such.  Either it's not that hard or it was beginner's luck!

Here's a closeup of the feathers; to stitch these, I used a variegated King Tut in the top of the machine and Mettler 100% cotton Silk Finish thread in the bobbin.  You can also see a little bit of the work in the upper right hand corner that I did with Glitter in the top.  I started out with the Mettler in the bobbin and had a bit of trouble balancing the tension.  At that point, Cindy advised me to switch to Bottom Line in the bobbin with the Glitter in the top, but I didn't notice much improvement.  I was running out of time and didn't take the care that I normally do when choosing upper machine tension, so that is something that I will be working on this week.

I want to get the first piece bound and the second piece finished and bound so I can take them with me to Chicago on Sunday.  Cheryl Hoffman, Brother's VP of Education, and I will be playing with the DreamWeaver next week and making some videos for Brother's website -- I always love hamming it up for the camera, so this should be a lot of fun!

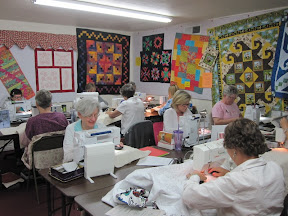
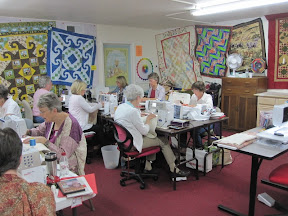
I really appreciated Cindy's teaching style; she would lecture each morning and then turn us loose to practice what she had taught us.  She's always circulating around the room, ready to help if you have a question or are at a sticking point in your work.  A thread suggestion here, a design suggestion there, and we all came out with really nice work at the end of the week.

Cindy has a number of retreats in McCloud CA (I'm less inclined to do those because it's a 12 hour drive from home rather than the 6 to Rancho Cordova) and in Rancho Cordova CA.  If you would like to experience Cindy's magic for yourself, you can read all about it at www.cindyneedham.com.  I've already signed up for the April 11-14, 2013, "linen ladies" workshop, so now I'm on the prowl for a couple of beautiful pieces of vintage linen to take with me!

Definitely an enjoyable week that vastly improved my machine quilting skills -- I have to say that it was worth every penny and every minute and firmly bonded me with this new machine....

Brother has provided me with the DreamWeaverTM XE, but all opinions expressed are entirely my own.

Wednesday, September 19, 2012

Sew Cal Gal's Free Motion Challenge

As a quilting teacher, you would probably expect me to understand the value of taking classes, honing one's skills, practicing a lot -- easier said than done for those of us on the road a lot!  But for the next five days, I'll be in Rancho Cordova taking Cindy Needham's "My Designs" workshop.  From what I understand of Cindy's background, she was once in the place where I am now -- very proficient with stencils, but not as experienced or confident with freehand designs.  This is what I want my emphasis to be over the next few days.

One of the other students brought in a piece she's been working on and it's from Sew Cal Gal's current Free Motion Challenge tutorial -- I was very excited because the current free motion tutorial is mine!   Here's the link:  http://sewcalgal.blogspot.com/2012/09/2012-free-motion-quilting-challenge.html

So Cindy was Ms. June and her tutorial is awesome -- here the link to it:  http://www.sewcalgal.blogspot.com/2012/06/june-fmq-challenge-by-cindy-needham.html

It was fun to be Ms. September!  If you get a chance, check it out!

Monday, September 3, 2012

Early Morning in the Antelope Valley

Dan and I went to breakfast early yesterday morning and look what we saw!


Another beautiful southern California day!


V-Sonic Pen Pal (Part 2)

Still having fun playing with this machine and discovering features!  One of the things that can be done with the sensor pen is indicating an end point where the machine will stop stitching before you lift your foot.  Let me walk you through that process and then some musings of mine about how to use it.....

I've chosen to demonstrate this function by sewing together two pieces of fabric that are unequal in length.  As in previous posts, I've decided on a 1/4" seam, so I have set the sew straight laser guide to 10.5, with needle position at 4.5 and the "J" foot on the machine. 

I start sewing my seam, stopping at any point where my intended end point is within the length of the laser light. 

To activate the pen, I touch the pen icon on the screen....

...then touch the last icon on the screen.  That's the icon that lets me set the point at which the machine will stop sewing.

A screen comes up instructing me to touch my desired sewing end point.

I touch the tip of the pen to the exact point where sewing should stop.  In an ideal world, the machine will slow down right before that point and then stop at the point exactly.

I can think of several uses for this "end point" function.  For piecers, it would be very handy for stopping exactly 1/4" before the end of the seam while adding borders to a quilt that will have mitered corners.  Or for stopping at the 1/4" point for set in seams, such as Y-seams.

I have also played with this using decorative stitches.  For instance, let's say you have a table runner, place mat, pillowcase or other piece where you are using a decorative stitch around the edge to form a border.  Using the end point function will actually alter the length of the stitch slightly (+ or - 10%) so that the corner turns without a pattern interruption. 

I know many of you sew other things besides quilts.  Can you think of other uses for this "end point" function?

Tomorrow I leave for a teaching trip to Dallas and San Antonio -- if you are in either area and want to hang out with me and take a class, here's a link to my schedule.  I'll be at Richland Sewing Center in Hurst TX through Thursday and then Creative Sewing Center in San Antonio Friday through Sunday.  There is also a shop hop going on in TX, so I'll be available to schmooze and demo on Sunday at Creative Sewing Center.

If you're doing the shop hop, be sure to stop in and see me!

Brother has provided me with the DreamWeaverTM XE, but all opinions expressed are entirely my own....

Friday, August 31, 2012

The V-Sonic Pen Pal


During convention, I simply called this the "cool pen" because there were so many cool things you could do with it.  But I have looked up the official name and it is the V-Sonic Pen Pal.  I should really remember that in case somebody asks....
 
It has a holder attached to the right side of the machine so that you can get to it easily and not keep dropping it.  I've never been a stylus person; I've used my finger on every touch screen machine that I've sewn on (except for Terry W.'s since she insists that I use the stylus).  However, I have found over the past few weeks that there are some functions that are much easier with the use of the pen.

To give you an idea of the size of the pen, here it is in my hand

This is my main Dreamweaver screen; I have the pen pointing at the V-Sonic Pen Pal icon.  If I touch that icon, another screen comes up that shows me the functions available while using the pen.

The first choice looks familiar; that's the icon for the laser light.

Touching the icon with the pen.....

The pen can then be used on the stitch plate of the machine to move the laser light to any position available.

This is what the laser light looks like when I first touched that icon; now I have the opportunity to move it using the pen.

I'm going to piece today and, as explained in prior posts, I like the laser set at 10.5 for piecing so that I can use the laser to make sure that I am feeding the fabric straight up to the inner toe of the "J" foot.  All I have to do is touch the pen to the stitch plate in front of that presser foot inner toe and the light will move overIt's fun to watch!  I know -- technology geek here!

After I remove the pen, the laser light stays right where I put it -- all set up for a day of piecing!

There are a few other fun things I can do with this pen.... still exploring!

Brother has provided me with the DreamWeaverTM XE, but all opinions expressed are entirely my own.....

Tuesday, August 28, 2012

One More Laser Application and the Multi Function Foot Controller

While playing around with DreamWeaver, I found another useful, time saving application for the Sew Straight Laser Vision Sewing Guide:

One way to make snowball blocks is to sew squares to each of the four corners and then trim away the extra triangles.  Again, I've been marking lines, corner to corner, on each of the smaller squares and then stitching directly on that marked line.  So -- what if I didn't have to mark?

Laser is set for center position, needle in center position, "J' foot on the machine and Q-01, which is called "Piecing Stitch - Middle" in the quilting stitch selection program, is my stitch of choice.  All I have to do is line up the laser and stitch on the line....easy peasy!

Can you think of other ways you would use the laser?  Maybe for quilting straight lines on a quilt, such as crosshatching (also called "diagonal grid"?  I know that I'm looking at this totally from my quilterly point of view, so there have to be sewing applications as well....what about spacing decorative stitching?  We did that in my project for convention and it worked really well.  What else?

Please leave comments -- I would love to know how you would use this and incorporate your ideas into my play time!

Now on to the multi function foot controller:


Here it is, just out of the box.  There is the main pedal, the smaller pedal to the left (I'll call it the second pedal), a metal bar to connect the two and a couple of large screws.  The size of the screws is nice because I don't have to use a screwdriver to put this together.

So I have choices for how I want to space the two pedals; there are three choices on the part that attaches to the back of the main pedal....

...and two choices for spacing on the second pedal.  This is cool because as I get used to it, I can change the spacing if it isn't totally comfortable for me.

So I got it set up and the screws tightened down just with my fingers so I can change it later if I want to.  In the upper right hand corner, I'm pointing (with pretty glittery red polish) to the cord that goes from the second pedal and plugs into the top of the main pedal.

And here's how it looks on the floor.  I have to remember that I can not only change the spacing, I can move the second pedal to the left of the main pedal if I want to.  I worked with it on the left side at convention, so now I'm going to try it on the right and see which way I like it.

So that was easy -- now what does it do?

As you can see in the picture above, which is a shot I took from one of the screens in the machine, there are two programmable areas here.  I can program each of them to do one of three things: needle up/down, thread cutting or reverse stitching.  I will probably always leave the bottom of the main pedal (the part closest to me) in the "needle position up/down" program.  If the needle is down and I tap that spot, it will come up and vice versa.  I have loved that feature in other machines and am happy to have it now.

How I program the second pedal will depend on the project.  If I'm piecing, I will most likely want it in the thread cutting mode; if I'm quilting and want to cut the threads very closely myself, I will program the second pedal for the reverse stitching mode.

That screen would look like the one above.  What I am liking about this is what I am consistently experiencing with DreamWeaver:  I can customize it for the way I want to sew and it is as easy as pulling up a screen and making a selection.  The multi function foot controller is one more way to make it mine....

I'll see how I like it on the right hand side and keep you posted if I make any changes....

Next up:  The V-Sonic Pen Pal...

Brother has provided me with the DreamWeaverTM XE, but all opinions expressed are entirely my own...


Friday, August 24, 2012

Brother Sew Straight Laser Guide -- Part 2

One of the reasons that I got so excited about the laser guide on the Dreamweaver machine is that I make a lot of flying geese.  Star quilts are definitely among my favorites and the flying geese unit is an excellent way to make the star points.  I did a blog post on how I like to make flying geese units; if you missed that or would like to review it, click here

The first thing I have to do to make these units is to draw a diagonal line, corner to corner, on the wrong side of each of the smaller squares cut for the units.  In the example that I used in the blog post, I used a silver pencil to be able to see the line on the back of this somewhat dark fabric. 

This is "Blossoms & Stars" from Needle In A Hayes Stack by my friend, Tiffany Hayes.  As you can see, there are four large star blocks in the center and 16 more in the pieced border area of this quilt.

Here's the center -- I love it!  This is also going to be way fun to quilt, although I won't be carting it around as part of my trunk show because it's 96" square.  Those pesky weight limits on airplane luggage!

I still have those 16 smaller blocks to make -- the finished flying geese units should ideally measure 2-1/2" by 4-1/2", 2" by 4" after they are stitched to the rest of the block units.

In my last post, I found that when piecing my results were best if I set the laser in the 10.5 position, used the J foot and set my needle position at 4.5.  So that's how I set up the machine.  I also engaged the pivot function; this is an action that I can engage or disengage with a touch of my finger on Dreamweaver's touch screen.  When engaged, it lifts the presser foot when I lift my foot from the pedal.  Although Dreamweaver does come with a knee lifter to raise the presser foot, it's nice to not have to use it after every single small seam when I'm doing chain piecing like this. 

I love using a knee lifter for machine quilting, but my knee can get really tired if I'm doing a lot of piecing.  It's really handy to have the option to use the pivot function for one way that I use the machine and the knee lifter for others -- another way that I am able to customize this machine to the project I'm sewing and the way I like to sew.

As you can see in the photo above, I am lining up the point of my squares with the laser light.....

While sewing, I'm moving the fabric into the machine, keeping the light lined up with my destination, point to point to point....

...until I finish that seam, still keeping the laser lined up with that last point.  When I used to draw the lines, I had to keep my eyes on the line to make sure that I was feeding the fabric properly.  Now I keep my eyes on the laser -- not the foot....not the needle....the laser.  The hardest part for me was to remember not to look at the side of the foot, but to look at the laser line

Once I've cut the large square, corner to corner, I start sewing the other square to the resulting units.  Again, it's just a matter of lining up the laser with the points of the square and stitching 1/4" away from the laser line.

These are my two sewn units; now I just need to cut and press to have my finished flying geese!

As I said above, the unit before sewing to the other parts of the star should measure 2-1/2" by 4-1/2" -- what do you think?

I think I just saved a boatload of time by not having to draw all those lines on the back of 64 little squares with some sort of marking tool -- happy girl!!!  Not that I'm impatient to see this beautiful quilt finished, or anything like that.....

Brother has provided me with the DreamWeaverTM XE, but all opinions expressed are entirely my own....

Related Posts Plugin for WordPress, Blogger...