After last autumn's busy season of traveling and teaching (I was home exactly two days in October!), I am happy to get back to my sewing room. I have two large tables where I do a lot of my away-from-the-machine work -- they're now cluttered with bags of fabrics, patterns, notions and books that I have either purchased or been given while I've been gone. Scattered in with some of these bags are fabrics pulled from my stash for consideration in future projects. In other words, quite a mess.
I'm also
looking over some of my works in progress and deciding on a
hopeful timetable for completion. One of these UFO's is a 56-1/2" square quilt called "Posey Patch" from the April 2011 issue of
American Patchwork & Quilting. This quilt features nine 16" pieced blocks, four of which are appliqued. I had pieced the four blocks last year and given them to my friend
Tiffany Hayes of
Needle in a Hayes Stack to work her hand applique magic. Tiffany likes to have a bit of handwork to do in the evening while she is spending time with her family and
she does beautiful work.
 She gave the blocks back to me months ago
 and so I put this quilt at the top of
my to-sew list. The applique is not exactly like the pattern in the magazine; we changed it up a bit for a more sophisticated look.
I also have a
new sewing machine to play with, the
Laura Ashley Limited Edition "Isodore" from Brother, so now it's time to
shove a stack of "stuff" onto the floor and piece the other five blocks:

The little four-patch in the center combines a green print with a green-on-white polka dot. That is surrounded by a peachy-pink floral ; the corners are a brown/blue/pink butterfly print that is one of the fabrics from a quilt for a cure line by Marcus Brothers. Interspersed among the butterflies are words in script, such as "Hope", "Kisses", "Friends" and "Love".
Next, the pattern called for 20 flying geese to measure 2" x 4" finished. I used the method that takes one large square and four small squares to make 4 units. To make them the size required, one 5-1/4" square of one fabric and four 2-7/8" square of the other were needed.

On each of the smaller squares, a line is drawn from corner to corner to act as a guide for the sewing.

Then two small squares are pinned to one large square, as shown.
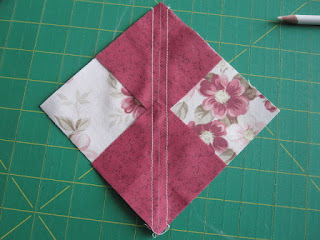
I stitched 1/4" on each side of the marked line...
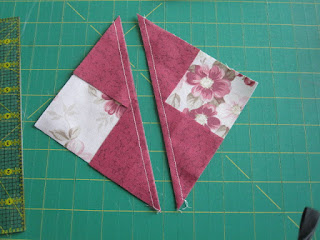
...then used the marked line as a cutting line.

At right, the two resulting pieces after pressing.
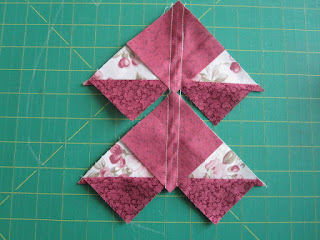
I pinned another small square to each of the pieced units and then stitched 1/4" on either side of the marked line.
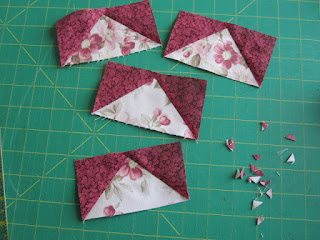
After cutting on the marked line, pressing and trimming off the notches, I have a pile of little bitty triangles and four flying geese units that measure 2-1/2" x 4-1/2".

When I stitch these to the other block components, the
finished size will be 2" x 4".I first learned this method of sewing flying geese units from Alex Anderson a few years ago and it has become my favorite method for making them. It seems to be easier and more accurate than sewing them one at a time. I even found a ruler that I can consult to determine the sizes of the large square and small squares for various finished sizes of geese. It is called Flying Geese x 4 "No Math" Ruler from Lazy Girl Designs.

After cutting 2-1/2" squares for the corners of the blocks, I stacked them up and was done for the day.


 This unit combines squares and triangles to surround the centers that I've already made...
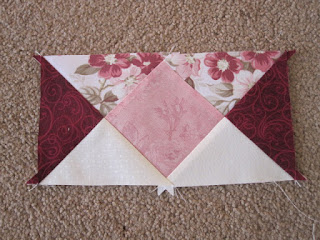 I really like the way this is going to look in the quilt!
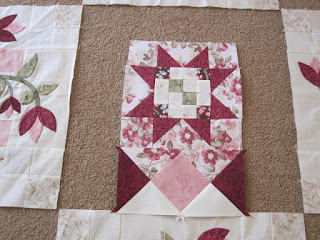

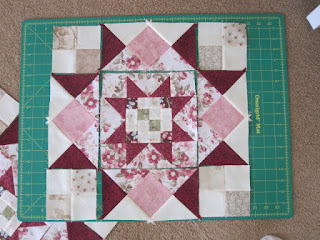 I laid everything out on the floor and then transported one block at a time to the sewing machine. This is a pretty big finished block, 16", so I used my 18" x 24" cutting mat to move the pieces. I use this method a lot when it is important not to get things mixed up.
 One of my trips this fall was in November; I taught at The Fabric Center in Morris IL for two days and then spent a night with my friend Carol in the Chicago area. From there I went to Grand Rapids MI and Lansing MI to teach for Gall Sewing and then back to Chicago to spend a few more days with Carol.
 A couple of weeks ago, Dan and I spent a few days in Lake Arrowhead. It's about a two hour drive through some small communities in the high desert area. We were driving through Littlerock and saw this sign -- what an odd combination! Ski gloves and beef jerky?
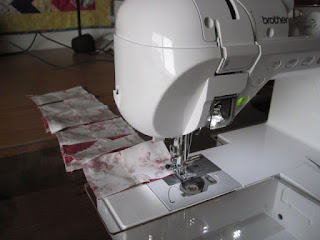 Putting my new "Izzy" through her paces by sewing the flying geese to plain squares. I helped introduce this machine to Brother dealers at their Back 2 Business convention last August; if you would like to read my review of Isodore at the convention,
  This is what my block center looked like before I chose the fabrics to complete it....
  I liked the way the breast cancer benefit fabric showed words in some of the little squares....
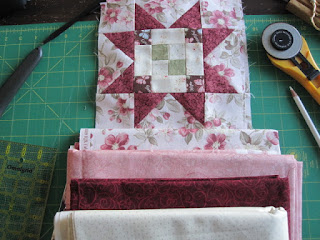 Here are the rest of the fabrics -- more of the floral print, a tone on tone


