Friday, August 31, 2012

The V-Sonic Pen Pal


During convention, I simply called this the "cool pen" because there were so many cool things you could do with it.  But I have looked up the official name and it is the V-Sonic Pen Pal.  I should really remember that in case somebody asks....
 
It has a holder attached to the right side of the machine so that you can get to it easily and not keep dropping it.  I've never been a stylus person; I've used my finger on every touch screen machine that I've sewn on (except for Terry W.'s since she insists that I use the stylus).  However, I have found over the past few weeks that there are some functions that are much easier with the use of the pen.

To give you an idea of the size of the pen, here it is in my hand

This is my main Dreamweaver screen; I have the pen pointing at the V-Sonic Pen Pal icon.  If I touch that icon, another screen comes up that shows me the functions available while using the pen.

The first choice looks familiar; that's the icon for the laser light.

Touching the icon with the pen.....

The pen can then be used on the stitch plate of the machine to move the laser light to any position available.

This is what the laser light looks like when I first touched that icon; now I have the opportunity to move it using the pen.

I'm going to piece today and, as explained in prior posts, I like the laser set at 10.5 for piecing so that I can use the laser to make sure that I am feeding the fabric straight up to the inner toe of the "J" foot.  All I have to do is touch the pen to the stitch plate in front of that presser foot inner toe and the light will move overIt's fun to watch!  I know -- technology geek here!

After I remove the pen, the laser light stays right where I put it -- all set up for a day of piecing!

There are a few other fun things I can do with this pen.... still exploring!

Brother has provided me with the DreamWeaverTM XE, but all opinions expressed are entirely my own.....

Tuesday, August 28, 2012

One More Laser Application and the Multi Function Foot Controller

While playing around with DreamWeaver, I found another useful, time saving application for the Sew Straight Laser Vision Sewing Guide:

One way to make snowball blocks is to sew squares to each of the four corners and then trim away the extra triangles.  Again, I've been marking lines, corner to corner, on each of the smaller squares and then stitching directly on that marked line.  So -- what if I didn't have to mark?

Laser is set for center position, needle in center position, "J' foot on the machine and Q-01, which is called "Piecing Stitch - Middle" in the quilting stitch selection program, is my stitch of choice.  All I have to do is line up the laser and stitch on the line....easy peasy!

Can you think of other ways you would use the laser?  Maybe for quilting straight lines on a quilt, such as crosshatching (also called "diagonal grid"?  I know that I'm looking at this totally from my quilterly point of view, so there have to be sewing applications as well....what about spacing decorative stitching?  We did that in my project for convention and it worked really well.  What else?

Please leave comments -- I would love to know how you would use this and incorporate your ideas into my play time!

Now on to the multi function foot controller:


Here it is, just out of the box.  There is the main pedal, the smaller pedal to the left (I'll call it the second pedal), a metal bar to connect the two and a couple of large screws.  The size of the screws is nice because I don't have to use a screwdriver to put this together.

So I have choices for how I want to space the two pedals; there are three choices on the part that attaches to the back of the main pedal....

...and two choices for spacing on the second pedal.  This is cool because as I get used to it, I can change the spacing if it isn't totally comfortable for me.

So I got it set up and the screws tightened down just with my fingers so I can change it later if I want to.  In the upper right hand corner, I'm pointing (with pretty glittery red polish) to the cord that goes from the second pedal and plugs into the top of the main pedal.

And here's how it looks on the floor.  I have to remember that I can not only change the spacing, I can move the second pedal to the left of the main pedal if I want to.  I worked with it on the left side at convention, so now I'm going to try it on the right and see which way I like it.

So that was easy -- now what does it do?

As you can see in the picture above, which is a shot I took from one of the screens in the machine, there are two programmable areas here.  I can program each of them to do one of three things: needle up/down, thread cutting or reverse stitching.  I will probably always leave the bottom of the main pedal (the part closest to me) in the "needle position up/down" program.  If the needle is down and I tap that spot, it will come up and vice versa.  I have loved that feature in other machines and am happy to have it now.

How I program the second pedal will depend on the project.  If I'm piecing, I will most likely want it in the thread cutting mode; if I'm quilting and want to cut the threads very closely myself, I will program the second pedal for the reverse stitching mode.

That screen would look like the one above.  What I am liking about this is what I am consistently experiencing with DreamWeaver:  I can customize it for the way I want to sew and it is as easy as pulling up a screen and making a selection.  The multi function foot controller is one more way to make it mine....

I'll see how I like it on the right hand side and keep you posted if I make any changes....

Next up:  The V-Sonic Pen Pal...

Brother has provided me with the DreamWeaverTM XE, but all opinions expressed are entirely my own...


Friday, August 24, 2012

Brother Sew Straight Laser Guide -- Part 2

One of the reasons that I got so excited about the laser guide on the Dreamweaver machine is that I make a lot of flying geese.  Star quilts are definitely among my favorites and the flying geese unit is an excellent way to make the star points.  I did a blog post on how I like to make flying geese units; if you missed that or would like to review it, click here

The first thing I have to do to make these units is to draw a diagonal line, corner to corner, on the wrong side of each of the smaller squares cut for the units.  In the example that I used in the blog post, I used a silver pencil to be able to see the line on the back of this somewhat dark fabric. 

This is "Blossoms & Stars" from Needle In A Hayes Stack by my friend, Tiffany Hayes.  As you can see, there are four large star blocks in the center and 16 more in the pieced border area of this quilt.

Here's the center -- I love it!  This is also going to be way fun to quilt, although I won't be carting it around as part of my trunk show because it's 96" square.  Those pesky weight limits on airplane luggage!

I still have those 16 smaller blocks to make -- the finished flying geese units should ideally measure 2-1/2" by 4-1/2", 2" by 4" after they are stitched to the rest of the block units.

In my last post, I found that when piecing my results were best if I set the laser in the 10.5 position, used the J foot and set my needle position at 4.5.  So that's how I set up the machine.  I also engaged the pivot function; this is an action that I can engage or disengage with a touch of my finger on Dreamweaver's touch screen.  When engaged, it lifts the presser foot when I lift my foot from the pedal.  Although Dreamweaver does come with a knee lifter to raise the presser foot, it's nice to not have to use it after every single small seam when I'm doing chain piecing like this. 

I love using a knee lifter for machine quilting, but my knee can get really tired if I'm doing a lot of piecing.  It's really handy to have the option to use the pivot function for one way that I use the machine and the knee lifter for others -- another way that I am able to customize this machine to the project I'm sewing and the way I like to sew.

As you can see in the photo above, I am lining up the point of my squares with the laser light.....

While sewing, I'm moving the fabric into the machine, keeping the light lined up with my destination, point to point to point....

...until I finish that seam, still keeping the laser lined up with that last point.  When I used to draw the lines, I had to keep my eyes on the line to make sure that I was feeding the fabric properly.  Now I keep my eyes on the laser -- not the foot....not the needle....the laser.  The hardest part for me was to remember not to look at the side of the foot, but to look at the laser line

Once I've cut the large square, corner to corner, I start sewing the other square to the resulting units.  Again, it's just a matter of lining up the laser with the points of the square and stitching 1/4" away from the laser line.

These are my two sewn units; now I just need to cut and press to have my finished flying geese!

As I said above, the unit before sewing to the other parts of the star should measure 2-1/2" by 4-1/2" -- what do you think?

I think I just saved a boatload of time by not having to draw all those lines on the back of 64 little squares with some sort of marking tool -- happy girl!!!  Not that I'm impatient to see this beautiful quilt finished, or anything like that.....

Brother has provided me with the DreamWeaverTM XE, but all opinions expressed are entirely my own....

Tuesday, August 21, 2012

What I Am Doing Cartwheels Over -- the Sew Straight Laser Guide!

Actually, I'm not sure that the "Sew Straight Laser Guide" is what this feature is officially called, but I will correct that later if necessary.  I just have to share it NOW!  It's an industry-first feature, i.e., nobody else has it, and it makes many piecing and decorative stitch applications a whole lot more accurate.  I found that when I use the laser guide, I feed my fabrics in a bit straighter and, therefore, get better results.

I first used it for piecing to see if I could get a better 1/4" seam.  Most of us struggle with getting and maintaining an exact 1/4"; I call it a "pressed quarter".  I find that if, by measurement with a ruler, I stitch an exact 1/4" from the edge of my fabric, the resulting seam allowance seems a little too big after pressing.  So, when stitching a "perfect" 1/4", my 12" block may be 11-5/8" or 11-3/4", depending on how many seams were involved.  That's what seems to happen to me when I use a 1/4" foot.

So I'm one of the radicals who like to sew with a non-1/4" foot and move needle position to get my seam allowance where I want it.  When I teach piecing classes, I find about half the class likes the 1/4" foot and half don't, usually because it makes the seam allowance too big for them.  My personal feeling is that it has a lot to do with your vision and how you sight down the side of your foot.

How I figure out where to move my needle for a perfect "pressed quarter"-inch seam:  I rotary cut three strips of fabric 1-1/2" x 6" each and sew them together, using what I think is an accurate 1/4" seam, side-by-side (in other words, on the long edges -- if this is hard to visualize, don't worry, there are pictures below).  After pressing, the resulting piece should measure 3-1/2" wide by 6" long if that seam allowance is accurate.  The sewn center strip should measure 1" across.  If the piece does not measure 3-1/2" exactly, then my seam is not accurate.  I will then repeat this exercise, moving my needle position to make the seam allowance either wider or narrower, depending on the results of the first test strips.  When I am trying out a new machine or a new presser foot, this is one of the first things I do.  I'll keep making these little test strip sets until I figure out exactly where I should be sewing.  Once I've got it, I write it down in the little notebook that I am keeping for that particular machine.

Yes, I make a little notebook for every machine I sew on.  I sew on too many machines to ever remember tensions, needle positions, width of decorative stitches -- you know, all those little details.  As I switch back and forth between machines, all I have to do is look in my notebook.  That's a lot easier than conducting experiments over and over and over.....

Here are the results of my piecing with the laser guide:

There is a good range of laser positions, both left and right of the needle.  For piecing purposes, I set the laser to its far right position.  I have the "J" foot on the machine, which is officially the "zigzag" foot, but I call it the all purpose foot because I use it most of the time.  The stitch selection is the piecing stitch right, Q-02.

BL (before laser), I aimed my fabric just at the very edge of the presser foot; SL (since laser), I find that I am running the fabric on the inside of the right hand toe and guiding my strips so that the fabric just barely touches the laser line.

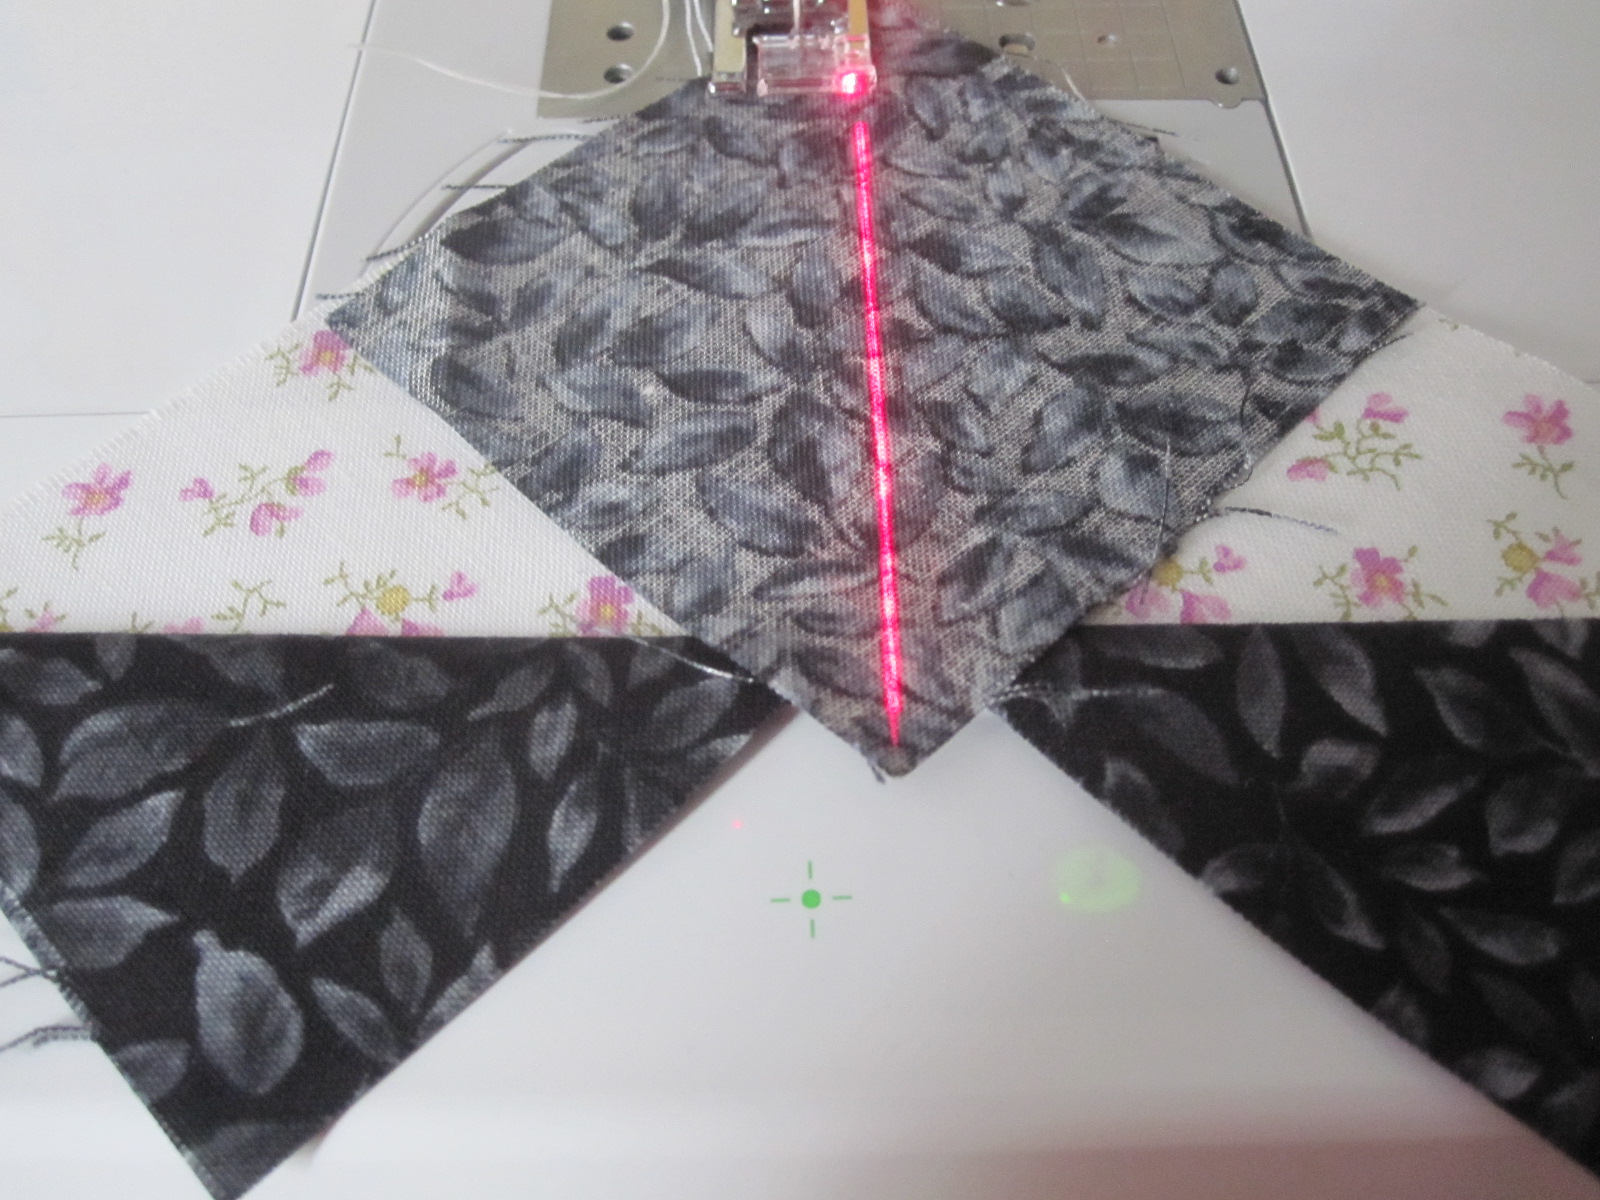
This is what it looks like as I'm sewing....the line is long enough for me to easily align my fabrics with it well before I get to the needle.

Since I am aiming for a different place on the foot now, I do have to run a strip test to see if I am getting an accurate pressed quarter.  This strip set was sewn with the machine on its default needle setting for the stitch I was using -- NOPE, that's way too narrow a seam allowance.  I'm a whole 1/4" over on my strip set measurement: 3-3/4" rather than 3-1/2"!

I adjusted the needle position so that it was further away from the laser guide so that my seam allowance would be deeper.  I chose needle position 4.5, thinking that if it was too wide, I'd just make one or more strip sets in the five increments in between until I narrowed it down.  But it turned out that 4.5 was perfect!  There are many possible needle positions, but just in the millimeter of space that I was playing in, between 4.5 and 5.5, there are seven possible needle positions, making it very easy to be as precise as you want to be!

So I wrote the actual settings on the strip sets so I would have them as a record; I usually throw these types of things in a plastic bag and keep them with the machine manual.  I also wrote in my notebook: Perfect pressed quarter: foot "J", laser guide 10.5, needle position 4.5, Mettler silk finish in both top and bobbin.  That way, if I change any of my variables, I'll know to run another strip test.

Tomorrow I'll show you a couple of other cool things you can do with the laser guide!

Brother has provided me with the DreamWeaverTM XE, but all opinions expressed are entirely my own....

Monday, August 20, 2012

We May Joke About It, But Size Really Does Matter!

Today is the day when I can officially talk about the latest machine that I am working with and start telling you about the new and creative features that will help us piece, applique and quilt better!  You can probably do a lot of other things, too, but those are totally outside my bandwidth....for instance, they include things like a zipper foot -- what would a quilter do with that?  Oh, wait a minute -- I saw that very cool quilt that was all put together with exposed zippers!

But I digress.....

I've been sitting on all this big news for almost a month and just have to tell somebody...so let's take off the cover and see what we've got!

First of all, the name:  Dreamweaver -- love it!  Of course, we had to listen to the song for three days during the convention and I still can't get it out of my head.

There are three machines available using the same basic frame setup: one sews, one embroiders and one does both.  I have the one that does both, (happy, happy girl!) so I'll be able to show you quite a bit, feature-wise.

This was the BIG deal, so to speak, at convention -- 11-1/4" from needle to arm (what I call "creative space")!  It's also 6-1/2" high, so there's a lot of room there.

Who is that going to matter to?  Well, quilters!  Yes, I can fluff & stuff a king size quilt through a standard domestic machine's 7-1/2" by 4" space, but if I don't have to?  Oh, yeah -- I can definitely see some possibilities here!  Like you, I have some quilts that are all ready to be quilted, but I just wasn't ready to tackle a big project.  This BIG space is going to make the process easier and faster!

I haven't unpacked the embroidery module yet because I will get to those reviews most likely next week, but I took this picture at convention to give you an idea of the size of this guy.  The machine itself measures 21", side to side, before the module is attached.

This is Dreamweaver happily resting in my cabinet at home.  It fits nicely and I have already contacted DreamWorld to get an acrylic insert that will fill in the cutout.  Having my machine set into a cabinet makes a big difference in how easy it is to quilt the larger quilts -- the ones I call the "land behemoths"!  My cabinet is made by Unique Sewing Furniture; I've been using their sewing room furniture for over 15 years and been very happy with the quality and durability.

What I would like you to notice in the above photo, though, is the reflection of the various lights on the wood at the front of my cabinet.  Brother gave us size and they added excellent lighting in that big space --  not only is there light at the needle, but also lights in the harp area.

I often see people bring Ott lights and other auxiliary lights to retreats and workshops.  Depending on how they are angled, they can really irritate the eyes of other people in the room, particularly the teacher as she walks around the room checking students' work; I can't count the number of days I've left with a migraine because of direct light hitting my eyes during the day.

I think the lighting on this machine will eliminate the extra lighting requirement for most people in a normal workshop/classroom situation.  Of course, there will always be that retreat at the beach house with the dungeon ambience.....

Tomorrow I'm going to talk about another kind of light on Dreamweaver -- an industry first!

Brother has provided me with the DreamWeaverTM XE, but all opinions expressed are entirely my own....

Sunday, August 19, 2012

Some Thoughts on Professionalism

I've wanted to write this post for a couple of weeks, but really had to think about it.  It was triggered by an e-mail from a lady in the midwest who has taken classes from me at her local Bernina dealer in the past.  She said: "I'm signed up for a class with you later this year, but saw all of your information about the Brother conference on your blog. Aren't you working for Bernina, anymore?"

Short answer:  I'm an independent and teach all brands, admittedly some better than others.

Long answer:  I'm an independent and teach all brands, admittedly some better than others.  Like many quilting instructors, I started by teaching for guilds, first in California and then around the country.  When we teach for a guild, we don't walk into a classroom equipped with top of the line machines of one top brand name.  There are machines of every make, model and age imaginable because that's what people own and what they are intending to sew on when class is over.  It is my job, as the teacher hired for that workshop, to help people achieve the desired results on whatever machine they have brought.

That isn't always possible; for instance, when people started buying small, lightweight travel machines to bring to class, they sometimes had problems trying to feed a large quilt through that small space in my Fluff & Stuff class.  I feel that I have a responsibility to warn people about this type of thing; for instance, most of my supply lists specify that the students bring a tray or extension table for their machines when quilting and that a straight stitch only machine won't work if you're in my embellishment or applique classes.  Steering a student to success is my job!  (And a note to people who take workshops from me:  If bringing your own machine is required, bring your grownup machine! That's the one you're going to do your actual quilting on....If you don't have to bring your own machine, don't whine! This is a wonderful opportunity to test drive a brand new machine focusing on stuff you actually want to learn!)

I still teach for guilds, but not as often as I teach for shops.  Some are quilt shops, some are machine dealers, some are both.  Sometimes people bring their own machines, sometimes the shop supplies the machines.  It is always easier for me when the shop supplies the machines, simply because I will be familiar with all the machinery in the classroom.  When it comes to machine settings, one demo does it, rather than the several needed when there are a variety of machines in the room.

That brings me to the heart of what I think of as professionalism: knowing enough about the various brands of machines to be able to help everybody in the room.  If a company offers me training or a "loaner" machine -- yes, I'm going to accept that because it will make me a more effective, better teacher.  Does that mean I am working for that company -- no.  I am still working for myself, a better educated self for accepting those offers.

So to answer Sarah's question honestly and fully, I have to say that while I am teaching for Brother dealers and will be reviewing their latest machine (which will not be shipped until September, but I am lucky enough to have a prototype in my sewing cabinet this minute) over the next several days, I still teach for Bernina dealers, Viking dealers, Pfaff dealers, Janome dealers, and guilds.

Each time I teach for a dealer with a machine unfamiliar to me (and there are new ones coming out all the time, which really keeps me on my toes), I make an effort to familiarize myself with the machine I will be using for demonstrations.  Sometimes that involves spending a weekend with a friend (needed to know a LOT more about the Viking Diamond Deluxe that Terry W. had just purchased before I taught for Appletree Quilting in Columbia MO), sometimes it means that a dealer ships a machine to me so I can put it through its paces before I get to their store (thank you, Lonnie, of The Fabric Center in Morris IL for the Janome machine I had for a few weeks).  All of this effort is so that I don't look like an idiot in front of my class -- if it looks easy, the student is more likely to be successful. 

In other words, all of this equates to being prepared.....

And that's how I define professionalism -- any comments?

Wednesday, August 15, 2012

I Think This is The One!

Sometime last year, thinking that I would somehow get control of my schedule and add more time, I agreed to be Ms. September in Sew Cal Gal's Free Motion ChallengeI love what Darlene has done here -- she has had 12 quilters (she says "experts", but I'll be a bit more modest) do tutorials on free motion quilting.  You can participate at any time, so if you haven't seen this yet, I strongly urge you to click here.

As you can see from the list, she has recruited a diverse and interesting group of quilters; I dived into Cindy Needham's tutorial the other day and the amount of information she supplied was amazing!  And I have enjoyed every single one of them.

Rather than focusing on actual stitching, I chose to do mine on my "fluff & stuff" method, which is how I move big quilts through a domestic machine.  I know a lot of people have problems with this and thought it would be a good contribution to the free motion challenge.

With that in mind, I made the hurculean effort today of cleaning up my work space so that I could take a picture of my machine, table, and (perhaps most importantly) the placement of said table.  Having that cabinet pushed right into the corner so that my quilts can't fall off to either the left or the rear takes a lot of work out of the quilting.  But -- oops -- I'm spoiling the plot!

So I took three pictures and decided on this one -- do you like it?

Friday, August 10, 2012

Another Fun & Sometimes Quilty Blog

One of my favorite decorating/lifestyle authors is Alexandra Stoddard, author of "Living a Beautiful Life" and several other wonderful books about bringing elegance and beauty to one's home and life.  I have five or six of her books and every so often will take one off the shelf, read it again and make a couple of changes that make things prettier around here.

The friend that introduced me to this series of books is Dawna Harrison, whose home totally shines as an example of the gracefulness Ms. Stoddard would love to help us attain.  Dawna, with her sister Fay, also owns my local quilt shop, Bolts in the Bathtub, so quilts are often incorporated in Dawna's decor.  At last count, I think she has made about a gazillion in the last 18 years.

Dawna called yesterday afternoon and invited me over for a nice cool glass of iced coffee.  It was 109 degrees here yesterday, so that was a welcome call!  There's my snack (I also stole some cookies off the dining room table) and that's Dawna blogging and hiding from my camera.

So while she was writing, I went to check out the latest table setting:


Of course I LOVE this one -- it's PINK!  Dawna has the table all set for tea with various teacups that she has collected on her travels.

The pretty tea set and pink roses.....

I nosed around for the cake that should be on this plate, but didn't find any......

A few months ago, Dawna decided to start a blog; it's called Stitches from the Tub.  In her blog, she not only covers quilty things, store events and BERNINA happenings, she also has decided to feature a weekly table setting that incorporates some of the lovely dishes and other findings that she has collected.  While we were enjoying our coffee yesterday, she was writing the blog for the tea party. 

I looked at her statistics for visits to her blog and -- wowie zowie -- she has a huge table setting following!  She was featured as an outstanding blogger on another table setting blog and has lots of people looking at it.  Of course, I'll keep tuning in to find out all the latest and greatest happenings at "my" quilt shop, but all that prettiness just waiting for guests to show up.......got to see that, too!

To see Dawna's blog, Stitches from the Tub, you can click on the link above or click here.

Thursday, August 9, 2012

Williams-Sonoma Cookbook Club

Random thoughts about quilting and cooking:  My theory is that next to quilting, for most of us our favorite pasttime is eating.  By association, that must mean that a lot of us really like to cook and I have to say, after attending numerous potlucks with contributions from quilters loading down the tables, we cook often. And well.

One of the things I love to do is take cooking classes.  The Williams-Sonoma in Valencia CA is about an hour's drive for me and they offer classes almost every Wednesday and demonstrations and such on Sundays.  It's a long enough drive that I don't go down often, but on the second Wednesday of each month, they have a Cookbook Club that I always try to go to if I'm in town.  The cost includes the cookbook, the demonstration and dinner!  This is a national event in the Williams-Sonoma stores that are equipped with kitchens, so if this appeals to you, you might check into it and see if your local store does this.

Each of us gets our own little table with a place setting and the featured cookbook.  This particular one isn't even available until September 10th, but I guess W-S might have a little pull with the publisher?  The glass contains a little treat that Lindsay made for us; it's a blackberry/rosemary spritzer.  She mushed the blackberries together with a bit of rosemary and probably some sugar and then added soda water to make it the right consistency, more a drink than a slushy.

This is Lindsay -- she's a CIA-trained chef who teaches these classes as well as some other classes in the Valencia store.  She is really what makes these classes so special for me.  Almost anybody can open a cookbook and follow a recipe -- Lindsay tastes and adds a little of this and a little of that and takes a dish from good to outstanding.  I have learned a lot from her about what works and what doesn't and she has really broadened my ability to make dishes different and yummier!

In the picture above, she is using an immersion blender (you know, the one Emeril calls a "boat motor") to puree Roasted Corn Soup.


Lindsay added chipotle seasoning to the soup and then garnished it with avocado slices and additional roasted corn.  She also said that a ring of cotija cheese would be pretty and good.  She just throws out these great ideas and I just nod my head and write them down.....

After we ate soup and watched her prepare dinner (actually, we get to do more than watch; we take turns playing with food...this month, I got to make dessert!), Lindsay set out several jars of seasonings for us to taste and compare.  The jar on the far left is a Serrano chili powder -- hot, hot, hot!!!!  The other four are various types of paprika.  Along with her suggestions, tasting the various seasonings gives us an idea of how we can use them in our cooking.

When it's a small class, we just sort of cluster around the cooktop, but for larger classes that stay seated except for those of us helping, the rest of us can look up into the mirror and see what's going on in the kitchen.  You can see where Lindsay's arm is; she's arranging potato and sweet potato planks on an olive oil coated baking sheet for oven roasting. Above that is the roasted corn she used for the garnish on the soup, to the right of the baking sheet is the big pot of corn soup and then roasted summer squash.  In the far upper right are the cereal cupcakes that I got to put together.  By this time in class, they're all baked and cooling on a cold part of the stove.

Patty's using the mini-Cuisinart to make arugula pesto for the meatball sandwiches; the original recipe called for walnuts, but Patty's allergic to those, so Lindsay went with a more traditional pinenut approach. 

So here's the finished plate, perfect for a casual supper:  Thin-Cut Fries for One (official recipe names), Grilled Meatball Sandwich and Grilled Summer Squash.  The meatballs were to die for -- mixture of ground beef, ricotta cheese, Parmesan, eggs, bread crumbs, garlic, etc.  Lindsay spread the pesto on the toasted bread, then a bit of marinara sauce (not called for in the recipe) and then the meatballs.  I'm not much of a bread person -- unless I bake it myself -- so I just ate all the goodies inside.

I also skipped dessert -- it just seemed way too sugary and buttery for me.  If I'm going to do that, I want something like creme brulee!

Next week is an Evening in Barcelona dinner -- signed up and can't wait!

Wednesday, August 8, 2012

Teaching Time

Designing a project for a large group of sewing machine dealers at a conventon is an interesting experience.

The first consideration is that it be small enough that it can be finished by everyone within a short amount of time.  I have 1-1/2 hours per session (and ten sessions!) -- that time has to cover explanation of the features of the machine as well as the sewing time to complete the project.

The second consideration is that the project utilize and show off the features of the particular machine that they are going to be selling in their stores this fall.  So with those two things in mind, and thinking of the book cover that I recently completed, I came up with the project for the Brother convention.


Each dealer received a kit containing pre-cut strips of fabric, a piece of stabilizer and two spools of thread.  There was a variegated 50 wt. thread from Mettler (thank you, Phil!) that was used for the piecing, decorative stitching and the main part of the embroidery.  A second thread was a copper metallic from Brother that was used as the second color in the embroidery.

Using the flip and sew method, the dealers sewed the four strips to the stabilizer and used decorative stitches on the outermost strips.  Then the piece was hooped and embroidered on the machine. 

I showed everybody my finished book cover and Jake Finch's book on how to make it (if you didn't see that post, you can  click here).  Jake's book, "Fast, Fun & Easy Book Cover Art" is out of print, but she does have copies on hand to sell.  If you have questions or would like a copy, you can e-mail Jake at alljake@hotmail.com.  In fact, next time I see her I'm going to snag a copy for a giveaway, so watch for that.

I liked making the book cover enough that I bought two more journals so that I will have more samples of this project.  I can definitely see teaching this for dealers in their stores.


Here's a glimpse of my classroom set-up and dealers ready to learn all about the new machine in front of them.  It's so exciting when something brand new is coming out!


This is the beauty that all the fuss was about!  I will be getting one soon and then I can tell you more about some of the industry-first features -- couldn't resist giving you a sneak peek, though!


Related Posts Plugin for WordPress, Blogger...